

Shipping container homes attract people for good reasons. They look strong, modern, and direct. They suggest speed. They suggest reuse. They suggest a house that starts with a ready-made steel shell instead of a pile of lumber. For some owners, the appeal is design. For others, it is cost, sustainability, or the chance to build something smaller and more personal than a typical suburban house.
A container home, however, is not just a container with windows. It is a real house, with the same demands as any other house. It needs a foundation, insulation, plumbing, electricity, heating, cooling, permits, drainage, safe exits, and long-term weather protection. The steel box is only the beginning.
A good container home starts with clear thinking. The strongest projects treat the container as a building material, not a shortcut. The worst projects begin with someone buying two cheap containers before checking zoning rules, soil conditions, transport access, or structural needs.
A container can become a compact cabin, a backyard office, a guest suite, a full-time home, or a larger modular build. Each use requires a different level of planning. A weekend cabin with basic power is not the same as a code-approved family home with bedrooms, bathrooms, laundry, HVAC, and year-round comfort.
The smartest path is simple. Understand the container first. Design around its limits. Spend money where the shell needs help. Avoid cutting blindly. Plan the hidden systems before choosing finishes. This guide walks through the main decisions, mistakes, and practical details that shape a successful container home.
The Container Dream and the Real Build
A shipping container feels like a head start because it already has walls, a roof, and a floor. That part is true. A container is built to carry cargo across oceans, withstand stacking loads, and survive harsh handling. The corner posts are strong. The steel frame is durable. The rectangular shape makes it easy to imagine rooms, decks, and stacked modules.
That strength can mislead new builders. A shipping container is strong as a container. Once you cut large holes into the sides, remove sections of wall, or combine several units, the structure changes. The steel corrugated walls help carry loads. When you remove too much steel, you may need reinforcement with beams, posts, and welding. That adds cost, labor, and design time.
A container home also needs comfort. Steel moves heat and cold quickly. In summer, an uninsulated container can become painfully hot. In winter, it can lose heat fast. In humid climates, condensation can form on cold metal surfaces. Without proper insulation and moisture control, a container house can feel damp, loud, and uncomfortable.
Many people assume container homes are always cheaper than traditional homes. Sometimes they are, especially when the design is small, simple, and carefully planned. A single-container studio can cost less than a custom framed building of the same size. A larger home with several modified containers, large glass openings, expensive finishes, crane work, and heavy structural reinforcement may cost as much as a traditional build.
Cost depends on the full project, not the price of the container. The container itself may be one of the smaller costs. Delivery, foundation, welding, windows, doors, insulation, roofing, electrical work, plumbing, permits, labor, and interior finishing often cost much more than the steel shell.
A better way to think about container construction is this: containers can save time and material in certain areas, but they create special costs in others. They reduce some framing work. They increase the need for metalwork, insulation planning, and moisture control. They can simplify modular layouts. They can complicate code approval in areas where inspectors are not used to them.
A serious project starts with a local reality check. Before buying anything, check zoning rules, building codes, minimum home sizes, foundation requirements, utility access, setbacks, height limits, and inspection requirements. Some places allow container homes with standard permits. Some require engineering drawings. Some treat them like manufactured housing. Some make approval difficult.
A container home can be practical, beautiful, and durable. It can also become an expensive lesson if the owner treats it like a weekend craft project. The difference usually appears before construction begins.
Choosing the Right Containers
The container you choose affects ceiling height, layout, insulation, transport, repair work, and resale value. Do not start by looking for the cheapest unit in the yard. Start by choosing the right size and condition for the job.
A standard 20-foot container is compact. It works well for a small office, studio, storage room, guest room, or tiny cabin. Its shorter length makes it easier to transport and place on tight sites. Its limited interior space, however, creates design pressure. After insulation, wall finishes, cabinets, and utilities, the usable width can feel narrow.
A 40-foot container gives more room for a one-bedroom layout, long kitchen wall, open living area, or combined bedroom and bath. It is more common for residential projects because it provides better planning options. It also requires more transport space, more foundation support, and careful placement.
A high-cube container is often worth the extra cost. A standard container usually has an exterior height of 8 feet 6 inches. A high-cube container is 9 feet 6 inches high. That extra foot matters. Once you add floor build-up, ceiling insulation, lighting, and mechanical routes, the interior height of a standard container can feel tight. A high-cube unit gives more room for insulation and still leaves a comfortable ceiling height.
Container condition matters as much as size. A one-trip container has usually made one shipping journey and tends to have fewer dents, cleaner surfaces, and better doors. It costs more, but it can reduce repair work. A used cargo container costs less, but it may have rust, floor damage, patched areas, hard-to-open doors, roof dents, or unknown cargo history.
Inspect the roof first. Water can sit in dents and cause rust. Check the corners and underside because these areas carry major loads. Look at the door seals, hinges, and locking bars. Check the floor for soft spots, chemical odor, oil stains, or heavy damage. Many containers have plywood floors treated for pest resistance. Some owners remove or seal the original flooring, especially when building a full-time home.
Rust is not always a deal breaker. Surface rust can be cleaned and treated. Deep rust, holes, severe pitting, and structural damage are more serious. A cheap container with major corrosion can cost more to fix than a better unit would have cost at the start.
The container must also fit the site. Delivery trucks need room to enter, turn, unload, and leave. A crane may be needed if the container must be placed over a fence, across uneven ground, or onto a tight foundation. Narrow roads, trees, overhead wires, soft soil, steep driveways, and tight corners can increase delivery costs.
Choose containers after you understand the design. Buying first can trap the project. You may end up with containers that are too low, too damaged, too narrow for the layout, or too costly to place. Good design begins with the site, climate, budget, and intended use, then the container follows.
Designing the Layout Around Real Life
A container home must work as a house before it works as a design statement. The best layouts solve daily problems. Where do wet shoes go? Where does laundry happen? Can two people pass each other in the kitchen? Can a bedroom fit a real bed and storage? Does the bathroom have enough ventilation? Can the living area get natural light without overheating?
The narrow width is the main design challenge. A standard container is about 8 feet wide on the outside. After interior framing and insulation, the finished width may be much less. That narrow shape can work well for kitchens, bathrooms, hallways, offices, and bedrooms, but it can feel tight in living spaces if handled poorly.
One simple approach is the linear layout. A single 40-foot container can hold a bedroom at one end, a bathroom in the middle, and a kitchen-living area at the other end. This works for a small home or rental unit. The layout stays efficient because plumbing can be grouped, and the long wall can carry storage, appliances, and built-ins.
A larger home often uses two or more containers side by side. Removing interior walls between them can create a wider living room, dining area, or kitchen. This opens the plan but requires structural reinforcement. The more walls you remove, the more engineering you need. Wide openings can work, but they should not be guessed on site with a cutting torch.
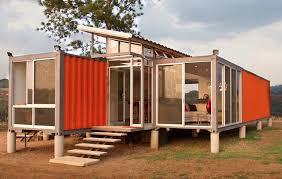
Stacked containers create another design path. A two-level home can place bedrooms above living areas, or use an upper container as an office or guest suite. Stacking requires careful attention to foundations, load paths, stair design, railings, waterproofing, and wind loads. The corners are designed to carry stacking loads, so alignment matters.
Outdoor areas can make a container home feel larger. A deck, covered porch, courtyard, or roof canopy can extend daily living space without adding much enclosed square footage. In warm climates, outdoor dining may become part of the home’s normal rhythm. The same planning logic used for restaurant patio chairs in a compact outdoor seating area can help a homeowner think about traffic flow, shade, spacing, and durable materials around a container deck.
Natural light needs discipline. A container with too few windows feels closed and heavy. A container with too much glass can overheat, lose privacy, and require more structural work. Place windows where they support daily use. A kitchen window over the sink, a glass door to the deck, a bedroom window for egress, and high windows for light can do more than random oversized openings.
Storage deserves early attention. Small homes become frustrating when every object has no place to land. Use built-in wardrobes, under-bed drawers, bench storage, tall cabinets, wall shelves, and utility closets. A container home can feel clean and calm when storage is planned into the walls. It can feel chaotic when storage is added later with loose furniture.
Plumbing should stay compact where possible. Place the kitchen, bathroom, laundry, and mechanical area close together. Long plumbing runs increase cost and waste space. In cold climates, plumbing also needs protection from freezing. A tight wet core can save money and simplify maintenance.
The roof design also matters. Some container homes keep the flat container roof visible. Others add a separate roof structure. A sloped roof or protective canopy can reduce heat gain, improve drainage, protect seams, and create space for solar panels. It can also make the home look less like a box dropped on a lot.
A strong layout respects the container’s shape without becoming trapped by it. It uses the long form where it helps, opens space where it matters, and avoids expensive cuts that do little for daily comfort.
Structure, Insulation, Moisture, and Weather
The technical parts of a container home decide whether the house ages well. Paint color, cabinet style, and flooring matter, but they cannot fix bad insulation, weak reinforcement, or trapped moisture.
Structure comes first. The container’s strength sits mainly in its corner posts, top and bottom rails, and corrugated steel panels. When you cut small openings for windows or doors, the container may need local reinforcement. When you cut large openings or remove entire side walls, it usually needs more serious steel support. A structural engineer can specify beams, posts, welds, and connection details.
Foundation choice depends on soil, climate, budget, slope, and local rules. Some container homes sit on concrete piers. Others use a slab, crawl space, strip footings, or full foundation. Piers can reduce concrete use and work well on some sites, but they must be designed for the loads. A slab can provide stable support and a finished base, but it costs more and may require more site preparation. In cold areas, frost depth affects the foundation design.
Level placement is critical. Containers can twist if poorly supported. Doors may stop closing properly. Interior finishes can crack. Water may collect in the wrong places. A foundation should support the container at the correct structural points and handle site drainage.
Insulation is one of the biggest decisions. Steel is a thermal bridge. It conducts heat and cold quickly. If you only add thin insulation between interior studs and leave steel paths exposed, heat can still move through the structure. The result may be cold spots, condensation, and higher energy bills.
Spray foam is common because it can stick to metal and reduce air gaps. Closed-cell spray foam can add insulation value and help control moisture, but it must be installed correctly. It also costs more than some other options. Rigid foam boards can work in wall or exterior assemblies, but seams need sealing. Mineral wool can provide good fire resistance and sound control, but it needs a proper wall system and moisture strategy.
Exterior insulation can reduce thermal bridging because it wraps the steel from the outside. It may preserve interior space and improve comfort. It also changes the exterior look and requires cladding. Interior insulation is more common in many projects because it keeps the steel exterior visible, but it reduces interior width.
Moisture control needs careful planning. Warm indoor air can hit cold steel and condense. Bathrooms, kitchens, laundry areas, and sleeping spaces produce moisture. Without ventilation and proper insulation, water can collect inside walls. That can lead to mold, corrosion, odors, and damaged finishes.
Ventilation solves part of the problem. Bathrooms need strong exhaust fans. Kitchens need proper range ventilation. Tight homes may need mechanical fresh air systems. In humid climates, air conditioning and dehumidification may be important. In cold climates, controlled ventilation helps avoid stale air without wasting too much heat.
Weatherproofing starts outside. Window and door openings must be flashed correctly. Welded seams and cut edges need protection. Exposed steel must be treated and painted. Roof drainage must move water away from the building. Flat surfaces need special attention because standing water can create rust and leaks.
A separate roof can help. It protects the container roof from sun and rain, adds shade, and creates an air gap. A simple sloped metal roof over the container can extend the life of the shell and make interior temperatures easier to manage. It can also provide overhangs, which protect walls, doors, and windows.
Sound is another technical issue. Rain on bare steel can be loud. Wind can create vibration. Hard interior surfaces can echo. Insulation, ceiling assemblies, acoustic panels, rugs, curtains, and soft furniture can reduce noise. Bedrooms need special attention because poor sound control becomes annoying fast.
Climate should shape every technical choice. A desert container home needs shade, ventilation, reflective surfaces, and cooling strategy. A northern home needs high insulation, protected plumbing, vapor control, and snow load planning. A coastal home needs corrosion protection and careful fastener choices. A humid southern home needs dehumidification and mold prevention.
The technical core is not the exciting part of the project, but it is the part that protects the money. A container home that ignores heat, water, and structure may look sharp on day one and fail within a few seasons.
Utilities and Comfort Behind the Walls
A container home needs the same basic systems as a conventional house. The difference is that space is tighter, walls are thinner, and every route must be planned. Electrical wires, plumbing pipes, drain lines, HVAC equipment, vents, and internet connections all need places to go.
Electrical planning should begin before insulation. Decide where the panel will sit, where outlets are needed, where lights will go, and where exterior power is useful. Small homes often need more outlets than expected because rooms serve multiple purposes. A dining table may also be a work desk. A bedroom may need charging, lighting, and climate controls. Outdoor areas may need power for lights, tools, or cooking equipment.
Lighting can change how a container feels. Long, narrow rooms need layered lighting. Ceiling lights alone can make the space feel flat. Wall lights, under-cabinet lights, reading lights, and exterior lights create better function. Recessed lights may require ceiling depth, so plan them early.
Plumbing works best when grouped. A bathroom near the kitchen reduces pipe runs. Laundry near the bathroom can simplify supply and drain lines. A tankless water heater can save space, though it must be sized correctly. Traditional water heaters need room and service access. In off-grid builds, water tanks, pumps, filters, and pressure systems require a dedicated plan.
Drain lines need slope. This simple fact can shape the layout. Toilets, showers, sinks, and laundry drains cannot be placed anywhere without considering gravity, venting, and access. A raised floor can hide plumbing, but it reduces interior height. A crawl space can help, but it increases foundation complexity.
Heating and cooling should match the size and climate. Mini-split heat pumps are common in small container homes because they do not require large ducts. They can heat and cool efficiently in many climates. Larger homes may need multiple zones. Very cold climates may need backup heat or cold-climate equipment.
Ventilation is not optional. A well-insulated container can become too tight if fresh air is ignored. Cooking, showering, breathing, and drying clothes add moisture. Good ventilation keeps air healthier and protects the building. Exhaust fans, fresh air intakes, and energy recovery ventilators may all have a role.
Fire safety needs attention. Use code-approved materials. Install smoke alarms and carbon monoxide detectors where required. Plan safe exits from sleeping areas. Do not create bedrooms with no proper egress window or door. Metal walls do not make a home automatically fire-safe. Interior finishes, wiring, appliances, and heating systems still carry risk.
Service access matters. Every system will eventually need maintenance. Hide pipes and equipment neatly, but do not bury them so deeply that repairs require demolition. Access panels, utility closets, and crawl spaces may not look exciting on a floor plan, but they save trouble later.
Comfort also includes furniture scale. Standard furniture can overwhelm narrow rooms. Choose pieces that fit the container’s proportions. Built-ins often work better than bulky freestanding pieces. A wall bench, fold-down table, shallow shelves, and compact sofa can create more usable space than oversized furniture chosen for a larger house.
The best container homes feel calm because the hidden systems are organized. The walls are not crowded with afterthoughts. The air is dry. The temperature is steady. The outlets are where people need them. The bathroom vents properly. The mechanical equipment has a place. That level of comfort comes from planning before the interior walls close.
Permits, Budget, Contractors, and Mistakes
Permits can decide whether a container home is possible. Some owners spend months designing a home that cannot be approved on their chosen lot. That mistake is avoidable. Start with the local building department, zoning office, or a professional who understands local rules.
Zoning controls what can be built on the land. It may address setbacks, height, minimum square footage, accessory dwelling units, parking, use, and appearance. Building codes control safety. They cover structure, electrical work, plumbing, insulation, energy use, fire safety, ventilation, stairs, windows, and exits. A container home must usually meet the same safety standards as other homes.
Engineering drawings may be required. This is especially true when containers are cut, stacked, or combined. An engineer can calculate loads, specify reinforcements, and provide drawings for permit review. Skipping this step can delay inspections and create safety problems.
Insurance and financing can also be harder for unusual builds. Some lenders and insurers do not understand container homes. Others will consider them if the home is permitted, code-compliant, permanently attached to a foundation, and appraised like a standard residence. Ask early. Do not assume a bank will finance the project just because it looks like a house in the renderings.
Budget planning should include every major category. The container purchase is only one line. Add delivery, crane service, foundation, site work, drainage, engineering, architectural drawings, permits, cutting, welding, reinforcement, sandblasting or surface prep, paint, framing, insulation, windows, exterior doors, roof system, plumbing, electrical, HVAC, ventilation, interior walls, flooring, cabinets, appliances, bathroom fixtures, lighting, decks, stairs, railings, landscaping, and contingency.
A contingency is not optional. Container projects often reveal surprises. The site may need more grading. Delivery may require a larger crane. A used container may need repair. A building inspector may ask for added details. Material prices may change. A realistic contingency helps the project survive these problems without stopping.
Contractor choice matters. Not every general contractor understands containers. Not every welder understands residential buildings. Not every designer understands thermal bridging. A strong team may include an architect or designer, structural engineer, general contractor, welder, electrician, plumber, HVAC contractor, insulation installer, and foundation crew.
DIY can save money in the right areas. Painting, some finish carpentry, basic landscaping, shelving, and interior details may be suitable for skilled owners. Structural cutting, welding, electrical service, gas work, complex plumbing, and code-critical systems should be handled by licensed professionals where required.
One common mistake is buying containers before the design is finished. This creates pressure to use what you already bought, even if the containers do not fit the site or layout. Another mistake is cutting too much steel to create a wide-open plan, then spending heavily on reinforcement. A third mistake is ignoring ceiling height until insulation and lighting make the rooms feel cramped.
Transport access is often forgotten. A container needs a truck route. A 40-foot unit is long and heavy. The delivery company needs room to maneuver. If the site is tight, crane costs may rise. If the ground is soft, trucks may get stuck. If overhead wires block access, placement may become complicated.
Another mistake is treating the container roof like a normal roof. A container roof was not designed as a comfortable residential roof assembly. It may hold water if dented. It may transfer heat. It may need reinforcement for roof decks, solar panels, or snow loads. Many projects benefit from adding a separate roof structure.
Interior finishes can also cause budget creep. Owners may begin with a low-cost container idea, then choose premium windows, custom cabinets, expensive tile, large glass doors, designer fixtures, and high-end appliances. There is nothing wrong with quality finishes, but they should be counted honestly.
A container home rewards disciplined decisions. Keep the shape simple. Group utilities. Choose high-cube containers. Avoid unnecessary cuts. Spend money on insulation, windows, weatherproofing, and structure before decorative details. A clean, modest, well-built container home usually beats a dramatic design that fights the material at every step.
Practical Tips for a Better Container Home
Use high-cube containers when the budget allows. The extra height improves comfort and gives more room for insulation, lighting, and mechanical routes. In a small home, ceiling height changes the whole feeling of the space.
Keep the design simple if cost matters. A single container, two parallel containers, or a clean stacked plan will usually cost less than a design with many angles, cantilevers, and large cutouts. Complexity adds engineering, welding, waterproofing, and labor.
Place wet areas close together. A kitchen, bathroom, laundry, and utility area grouped along one zone can reduce plumbing cost and make repairs easier. Spread-out plumbing may look easy on a sketch, but it adds pipes, drains, vents, and labor.
Protect the steel. Cut edges, welds, scratches, and rust spots need treatment. Use proper primers and coatings. In coastal areas, take corrosion seriously. Salt air can punish exposed metal.
Do not rely on thin insulation. Steel moves temperature quickly. A container home needs a real insulation plan, not a token layer behind drywall. Think about thermal bridging, vapor control, ventilation, and climate.
Add shade where heat is a problem. Overhangs, pergolas, exterior screens, trees, awnings, and roof canopies can reduce cooling loads. Shade often works better than trying to fight heat only with air conditioning.
Use good windows and doors. Cheap openings can leak air and water. They can also make the home less comfortable. Invest in properly flashed, code-compliant windows and exterior doors. Pay special attention to egress requirements in bedrooms.
Plan storage before buying furniture. A small home needs built-in thinking. Use vertical space. Use benches with storage. Use cabinets to divide zones. Avoid clutter by designing places for shoes, coats, tools, cleaning supplies, and seasonal items.
Think about maintenance from day one. Leave access to shutoff valves, electrical panels, filters, pumps, water heaters, and HVAC equipment. A beautiful wall that hides a future repair point will not feel beautiful when something leaks.
Visit a finished container home if possible. Photos hide scale, sound, heat, and storage problems. Standing inside a real unit teaches more than looking at renderings. Pay attention to ceiling height, room width, air quality, and noise.
Build small first if you are unsure. A backyard office, guest unit, or rental cabin can teach valuable lessons before a larger home. Smaller projects still need permits where required, but they reduce risk.
Consider resale from the start. A highly personal container home may be hard to sell if it ignores normal buyer expectations. Bedrooms, storage, parking, natural light, durable finishes, and code approval matter for future value.
Do not hide problems behind style. Exposed steel, dark paint, reclaimed wood, and industrial lighting can look strong, but they do not fix poor drainage, weak insulation, bad welding, or missing permits. The bones of the building matter more than the theme.
Shipping containers can become serious homes when owners respect the work involved. The shell gives the project a strong starting point, but the final home depends on planning, engineering, weather control, and comfort. A container is not magic. It is a steel module with potential.
A successful container house starts before the first wall is cut. It starts with the site, the rules, the climate, the budget, and the way people will live inside. When those pieces guide the design, the container becomes more than a box. It becomes a durable, practical home built with clear decisions instead of wishful thinking.